-
Flight Focus
To me, an airplane cabin is an almost ideal place to read, write, study, focus, etc. I tend to get distracted and procrastinate a lot, but flights have been a pretty good environment for deep thought.
- Minimal distraction: there technically is internet access on many flights, but it costs money, so access is disincentivized. The only available media are the built-in entertainment options or whatever you bring along. There’s minimal range of movement so you can’t even go for a walk or have a look around.
- Hard to sleep: you can’t simply snooze because it’s quite uncomfortable and you’re forced to be sitting
- Can’t leave
- Predetermined duration: you know approx how long you’ll be sitting there, making it possible to plan focus blocks
Maybe one day there will be a flight passenger simulator where you can go get strapped in for 7 hours, offering the deep focus afforded by a flight without the dry air, pressure changes, cost, etc.
-
Generative AI Accelerates Our Exploration of the Search Space
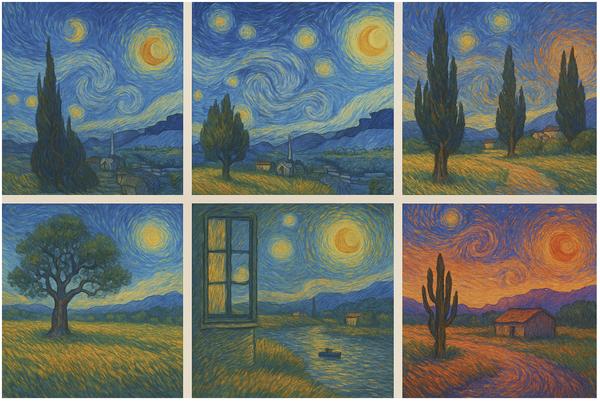
A big room filled with images
In the book Why Greatness Cannot Be Planned, the authors liken innovation to discovery within an abstract search space. One of the examples in the book is about the creation of masterpieces, like Van Gogh’s The Starry Night.
So we can think of creativity as a kind of search. But the analogy doesn’t have to stop there. If we’re searching for our objective, then we must be searching through something. We can call that something the search space—the set of all possible things. Now try to picture this space—it’s as if different possibilities appear at different locations in a big room. Imagine this giant room in which every image conceivable is hovering in the air in one location or another, trillions upon trillions of images shimmering in the darkness, spanning wall to wall and floor to ceiling. This cavernous room is the space of all possible images. Now imagine walking through this space. The images within it would have a certain organization. Near one corner are all kinds of faces, and near another are starry nights (and somewhere among them Van Gogh’s masterpiece). But because most images are just television noise, most of the room is filled with endless variations of meaningless gibberish. The good stuff is relatively few and far between.
I love the concept of this space as a big room filled with images. How many images would be in such a room? Assuming only 10 megapixel images and that each pixel can take one of 10M color values (estimated upper limit for what humans can distinguish), that’s 10^(70,000,000) possible images (compare that to the 10^80 atoms in the observable universe). That’s kind of a lot!
As the quoted passage points out, the vast majority of these images would just look like random static. Most of the potential ways pixels can be configured is meaningless, not conveying useful information.
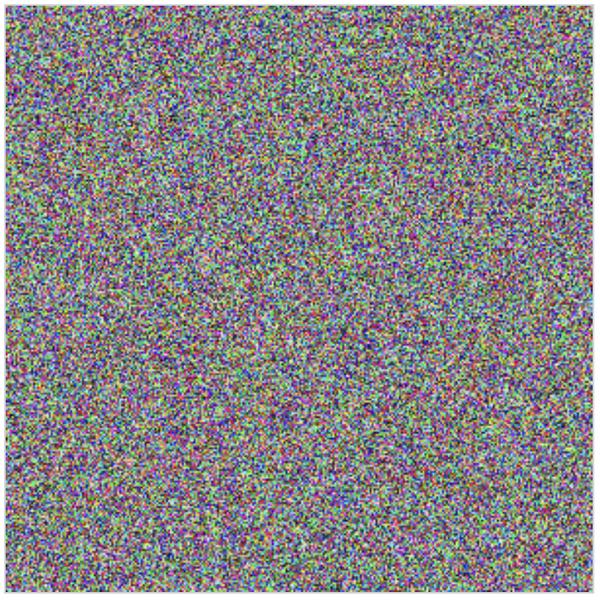
Consider a smaller room that’s the search space of “all binary 3x3 pixel images”. We can actually see into this room. With nine pixels each taking one of two colors we have 2^9 = 512 images. Here they are:

Finding notable images in this search space is easy – just scan them (I see a plus sign, an H, etc). We ascribe some kind of meaning to certain configurations, though they’re not especially interesting. But with big images and all their variety, the search space of possibilities is enormous. We can’t enumerate even the tiny fraction of those non-noise images. That’s good, because it means we have practically infinite different things to look at. But it also suggests that there are many great artworks waiting to be discovered, and many that may never be discovered.
What is a masterpiece? If painted today, The Starry Night would not be a masterpiece, it would be a reproduction. A central argument in Why Greatness Cannot Be Planned (WGCBP) is that a good way to discover innovative samples in the search space is through what’s called novelty search – rather than trying to chart a path to a specific objective, an often better approach is to just do what seems interesting and novel.
How do we discover new masterpieces? We collectively explore the search space as billions of individuals with different tastes, talents, and motivations. It’s necessary to understand what has been done before to help one find novelty in the search space. Another analogy for how artists carve out their own niche – to uncover a novel area of the search space – is photographer Arno Minkkinen’s Helsinki Bus Station Theory:
There are two dozen platforms, Minkkinen explains, from each of which several different bus lines depart. Thereafter, for a kilometre or more, all the lines leaving from any one platform take the same route out of the city, making identical stops. “Each bus stop represents one year in the life of a photographer,” Minkkinen says. You pick a career direction – maybe you focus on making platinum prints of nudes – and set off. Three stops later, you’ve got a nascent body of work. “You take those three years of work on the nude to [a gallery], and the curator asks if you are familiar with the nudes of Irving Penn.” Penn’s bus, it turns out, was on the same route. Annoyed to have been following someone else’s path, “you hop off the bus, grab a cab… and head straight back to the bus station, looking for another platform”. Three years later, something similar happens. “This goes on all your creative life: always showing new work, always being compared to others.” What’s the answer? “It’s simple. Stay on the bus. Stay on the fucking bus.”
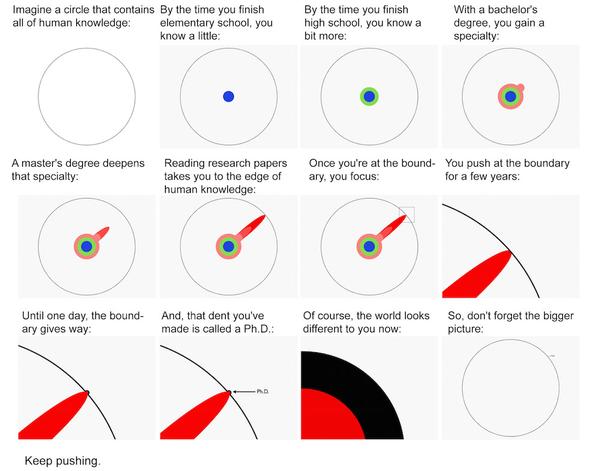
I’ve talked so far about visual art, but the search space isn’t just about images. It’s about innovation across the entire universe of ideas. Science, engineering, fashion, music, math, film, literature – these all have search spaces.
A nice visualization of this is Matt Might’s illustrated guide to a Ph.D.:
Aside: the world of forms
WGCBP also frames biological evolution as a natural process for exploring the search space of life forms. I’ve been thinking about how these two kinds of evolution (biological and cognitive) seem like part of a single process. I recently saw this article (and its HN thread) about the suggestion that non-living physical systems are subject to a similar evolutionary process, following a gradient of increasing complexity which the proponents call “functional information”.
In this new view, biological evolution appears not as a unique process that gave rise to a qualitatively distinct form of matter — living organisms. Instead, evolution is a special (and perhaps inevitable) case of a more general principle that governs the universe. According to this principle, entities are selected because they are richer in a kind of information that enables them to perform some kind of function.
I haven’t fully thought about the idea of functional information yet. Is there a universal selection process across these different systems? The geosphere, biosphere, and noosphere are all like step changes, one giving rise to the next, providing new substrates for the emergence of more complexity.
This cosmic search space is structured due to constraints in math and physical space. As Dr. Michael Levin writes:
Mathematicians are already very comfortable with this – the old idea (Plato, Pythagoras, etc.) that there is a non-physical space of truths which we discover, not invent, and that this space has a structure that enables exploration. I make the conjecture that this space contains not only low-agency forms like facts about triangles and the truths of number theory, but also a very wide variety of high-agency patterns that we call kinds of minds.
It’s kinda neat to think that our innovations are discoveries of latent truths, and that they might be driven by the same fundamental process of exploration that gave rise to our minds.
Implications for creators
I believe generative AI is a powerful new tool for thought. It helps us explore the search space of ideas faster and more effectively. Seeing more of the landscape of already-explored ideas better equips users to find novel, interesting ideas faster.
To someone who relies on painting, or playing an instrument, or writing long-form blog posts as a way to express themselves and participate in the zeitgeist, generative AI may be a superfluous annoyance. Like “I wanted robots to clean my bathroom, not write poetry”. But the fact that AI can mimic human-level output in these areas does not lessen our ability to craft such things for pleasure.
Generative AI doesn’t cheapen human creativity. It does lower the barrier to entry, though. It commoditizes certain kinds of production. I understand how someone who has spent years or decades honing their craft could feel worried about what the continued development of this tech portends. Especially if their livelihood is threatened. Some popular artists now unfortunately see their style plagiarized on a massive scale, with models that were trained on their work, all with no compensation. They have a right to be outraged. And many more rank and file creative professionals (graphic designers, copywriters, etc) are probably feeling the squeeze.
As a software engineer, I have to question what AI means for my job as well. I’m optimistic that I can adapt, but I know that comes from a place of privilege. My hope rests on the belief that generative AI tools can help me and my industry be more impactful and more innovative. That they can help us fast forward over ground that’s already been covered and put our efforts toward exploring the frontier, where human innovation still leads.
I am uncertain about what this all could mean for new practitioners, as I’ve discussed before. That is, it may be hard for novice creatives to turn into experts if the fiddly details of the work are automated away. I can imagine a world where an unequal distribution of AI powers promotes further inequality. A misallocation of AI resources can also lead to bimodal outcomes. At least in the medium term, firms that eschew human experts in favor of AI agents will join a race to the bottom. On the other hand, those that give their human experts AI tools, and develop and train for best practices with those tools, will produce higher quality work.
Consider this comment on /r/freelanceWriters:
Everything you said about why AI writing sucks might be true. But it doesn’t matter. The people who are buying copy from AI models rather than from people — they’re incapable of judging good writing from bad. It’s all just words on a page to them. They fundamentally see no difference between getting it from a machine and getting it from a person. If their AI copy doesn’t convert, well, they’ll just get different AI copy.
There are clients, of course, who absolutely can tell good from bad. They might experiment with it, maybe even find some uses for it. But they will value content from real writers and will continue to pay for it. The trick is finding those clients.
For now, I’m still of the opinion that AI can’t actually make the leaps of insight necessary to arrive at true novelty. Its creations are remixes, derivative by design. But generative AI can uncover more crevices throughout the search space; it helps guide where to look next. Innovators that embrace these tools will, I think, be able to do more than they would have without them.
Onwards and upwards
This tech is still progressing. Even if no new foundational models or techniques were developed, I think there’s still a lot of untapped potential in utilizing these tools in new ways. I know there is an AI hype cycle, and that posts like this feed it. But as someone who’s been using computers since I was a kid, I still can’t really believe that we can now talk to machines. That we can describe an imagination in words and see it seconds later. That we analyze LLMs’ output empirically because their behavior is emergently complex. Traditional software was deterministic and, though often buggy, ultimately explainable. That’s increasingly not the case, and it’s unsettling. These models are imperfect and messy and weird, just like people.
-
AI Assistant Use-Case: Performance Feedback
At my company we give ourselves peer, upward, and self performance feedback.
I don’t mind this practice because I understand the value that it can bring in terms of career development and team cohesion. But writing reviews can take quite a bit of time, especially for more senior members of the team. We do it twice a year in the spring and fall.
This cycle, I looked into using generative AI assistants to help me write feedback. So far this process is much preferable to writing it without LLMs.
Some thoughts and tips…
- Provide data sources to the AI about what a colleague worked on
- AI assistants can process large volumes of even unstructured data very quickly
- Data exists on teammates’ contributions, though some might be easier to access
- Tickets created and closed by individuals
- Daily standup notes (we use Geekbot for this)
- Slack discussions
- Docs, sheets, wikis, other artifacts
- Code and code reviews
- Prior review feedback
- Data helps ground the feedback and make it more specific
- Also helps you to recall what somebody worked on
- Prompt with relevant information
- Like the colleague’s role/level, your role and relationship to them, how long they’ve worked on the team, their main contributions, etc
- Your company’s expectations around performance in different capabilities at different levels (career matrix)
- Your team’s goals
- Your company’s examples of well-formed performance feedback
- Provide subjective thoughts on the colleague
- Recall how it felt working with them
- What you thought some of their core strengths and weaknesses have been
- I use voice mode with a stream of consciousness style discussion here to generate ideas and let the AI clean it up later
- Ask the AI to challenge your beliefs against the data you have (eg does Sally really get bogged down in details or does her work history show she has a good balance with strategic planning?)
- Work with the AI to uncover nuances in teammates’ performance that might be valuable to recognize
- Create reusable tools for yourself and others
- A Custom GPT in ChatGPT, links to collect data, or useful prompts can be shared
I do think this approach risks turning into that meme where like I ask my chatbot to translate my bullets into a paragraph and my manager asks their chatbot to translate the paragraph back into bullets. But I’m trying to avoid that outcome by tuning the output to be concise.
So far I feel like this process has helped me write better performance feedback more effectively. Maybe I can return to the same chats in the next cycle or mid cycle to track performance over time.
- Provide data sources to the AI about what a colleague worked on
-
Poor Man's Computer Use with Execute Arbitrary AppleScript MCP Server
Disclaimer: you should definitely not do this!
I have been playing with Model Context Protocol and just realized you can get proof-of-concept-level computer use with very minimal code if you give the MCP client the ability to execute AppleScript and take screenshots. With just these rough tools you can coax some agentic behavior with a feedback loop.

#!/usr/bin/env python3 from mcp.server.fastmcp import FastMCP, Image import os import subprocess # Initialize the MCP server with a chosen name mcp = FastMCP("applescript_server", dependencies=["pyautogui", "Pillow"]) @mcp.tool() def applescript_run(script: str) -> dict: """ Executes arbitrary AppleScript via osascript. Args: script (str): The AppleScript code to execute. Returns: dict: A dictionary containing stdout, stderr, and the return code. """ try: # Run the AppleScript command using osascript proc = subprocess.run( ['osascript', '-e', script], capture_output=True, text=True, check=False # Allow non-zero exit codes to be returned in the response ) return { "stdout": proc.stdout.strip(), "stderr": proc.stderr.strip(), "returncode": proc.returncode } except Exception as e: return {"error": str(e)} @mcp.tool() def take_screenshot() -> Image: """ Take a screenshot using AppleScript to execute macOS' screencapture, forcing JPEG output. If the JPEG data exceeds 1MB, downscale the image to reduce its size. """ import io, tempfile, os from PIL import Image as PILImage # Create a temporary file with a .jpg suffix. with tempfile.NamedTemporaryFile(suffix=".jpg", delete=False) as tmp_file: tmp_filename = tmp_file.name # Use AppleScript to run the screencapture with JPEG output. script = f'do shell script "screencapture -t jpg -x \\"{tmp_filename}\\""' result = applescript_run(script=script) if result.get("returncode", 0) != 0: error_msg = result.get("stderr") or "Unknown error during screenshot capture" return {"error": f"Screenshot failed: {error_msg}"} try: # Open the captured image img = PILImage.open(tmp_filename) # Function to save image to JPEG buffer with compression. def save_to_buffer(image): buf = io.BytesIO() image.save(buf, format="JPEG", quality=60, optimize=True) return buf.getvalue() # Save image and check size. image_data = save_to_buffer(img) max_allowed = 1048576 # 1MB if len(image_data) > max_allowed: # Downscale the image to reduce size. new_size = (img.width // 2, img.height // 2) img = img.resize(new_size, PILImage.LANCZOS) image_data = save_to_buffer(img) except Exception as e: return {"error": f"Error processing screenshot file: {e}"} finally: try: os.remove(tmp_filename) except Exception: pass return Image(data=image_data, format="jpeg") if __name__ == '__main__': # Run the server using stdio transport so that it can be invoked by local MCP clients mcp.run(transport="stdio") -
Please don’t disable paste
It’s tax season. I unfortunately had to log in to the Philadelphia Revenue Department’s website. There are a lot of things that could be said about the city’s web UX, but I’ll save those thoughts for now. What I want to share is a plea.
Please don’t disable paste. A pattern I saw and have seen on many bureaucratic sites is two fields like this:
- Enter <some-info>
- Re-enter <some info> to confirm
With paste disabled on the second field. I guess that the developers don’t want users to paste a copied typo? But (A) I’m less likely to make a mistake if I’m copying and pasting data directly from another source, and (B) on the off chance the data is wrong, I’d rather pay the low probability price of a round trip for a backend error than the guaranteed price of tediously typing out some string. Or you could do client side mismatch detection.

With mobile browsers this becomes even more important since I can even copy text directly from photos of physical docs thanks to built-in OCR, and typing on the phone keyboard is especially annoying. Allowing paste is a small thing that can improve user experience cheaply.