-
Noise generator
I often need to drown out distractions when trying to concentrate, and sometimes to do that I opt for using a noise generator. Searching for how to generate noise at the command line, I discovered this great answer on the Ubuntu Stack Exchange about using SoX.
Adapted for macOS (and assuming
brewis installed):brew install sox play -n synth brownnoise synth pinknoise mix synth sine amod 10 100I now have an alias to produce a pleasant mix of pink and Brown noise :D
-
Validation Curve Plot from GridSearchCV Results
For a course in machine learning I’ve been using sklearn’s GridSearchCV to find the best hyperparameters for some supervised learning models. I wanted to fix all but one of the hyperparameters to be set to the
best_params_values, and then plot the model’s performance as a single parameter was varied. It can be time consuming to run those experiments directly withmodelselection.validation_curve(), and the search grid already contains scores for various parameter values. I found examples of plotting the grid’scv_results_when a couple of parameters are considered, but some of my grid searches were over more parameters that I wanted to plot.So I wrote this function which will plot the training and cross-validation scores from a
GridSearchCVinstance’s results:def plot_grid_search_validation_curve(grid, param_to_vary, title='Validation Curve', ylim=None, xlim=None, log=None): """Plots train and cross-validation scores from a GridSearchCV instance's best params while varying one of those params.""" df_cv_results = pd.DataFrame(grid.cv_results_) train_scores_mean = df_cv_results['mean_train_score'] valid_scores_mean = df_cv_results['mean_test_score'] train_scores_std = df_cv_results['std_train_score'] valid_scores_std = df_cv_results['std_test_score'] param_cols = [c for c in df_cv_results.columns if c[:6] == 'param_'] param_ranges = [grid.param_grid[p[6:]] for p in param_cols] param_ranges_lengths = [len(pr) for pr in param_ranges] train_scores_mean = np.array(train_scores_mean).reshape(*param_ranges_lengths) valid_scores_mean = np.array(valid_scores_mean).reshape(*param_ranges_lengths) train_scores_std = np.array(train_scores_std).reshape(*param_ranges_lengths) valid_scores_std = np.array(valid_scores_std).reshape(*param_ranges_lengths) param_to_vary_idx = param_cols.index('param_{}'.format(param_to_vary)) slices = [] for idx, param in enumerate(grid.best_params_): if (idx == param_to_vary_idx): slices.append(slice(None)) continue best_param_val = grid.best_params_[param] idx_of_best_param = 0 if isinstance(param_ranges[idx], np.ndarray): idx_of_best_param = param_ranges[idx].tolist().index(best_param_val) else: idx_of_best_param = param_ranges[idx].index(best_param_val) slices.append(idx_of_best_param) train_scores_mean = train_scores_mean[tuple(slices)] valid_scores_mean = valid_scores_mean[tuple(slices)] train_scores_std = train_scores_std[tuple(slices)] valid_scores_std = valid_scores_std[tuple(slices)] plt.clf() plt.title(title) plt.xlabel(param_to_vary) plt.ylabel('Score') if (ylim is None): plt.ylim(0.0, 1.1) else: plt.ylim(*ylim) if (not (xlim is None)): plt.xlim(*xlim) lw = 2 plot_fn = plt.plot if log: plot_fn = plt.semilogx param_range = param_ranges[param_to_vary_idx] if (not isinstance(param_range[0], numbers.Number)): param_range = [str(x) for x in param_range] plot_fn(param_range, train_scores_mean, label='Training score', color='r', lw=lw) plt.fill_between(param_range, train_scores_mean - train_scores_std, train_scores_mean + train_scores_std, alpha=0.1, color='r', lw=lw) plot_fn(param_range, valid_scores_mean, label='Cross-validation score', color='b', lw=lw) plt.fill_between(param_range, valid_scores_mean - valid_scores_std, valid_scores_mean + valid_scores_std, alpha=0.1, color='b', lw=lw) plt.legend(loc='lower right') plt.show()plot_grid_search_validation_curve(grid__digits, 'model__alpha', log=True, ylim=(.92, 1.02))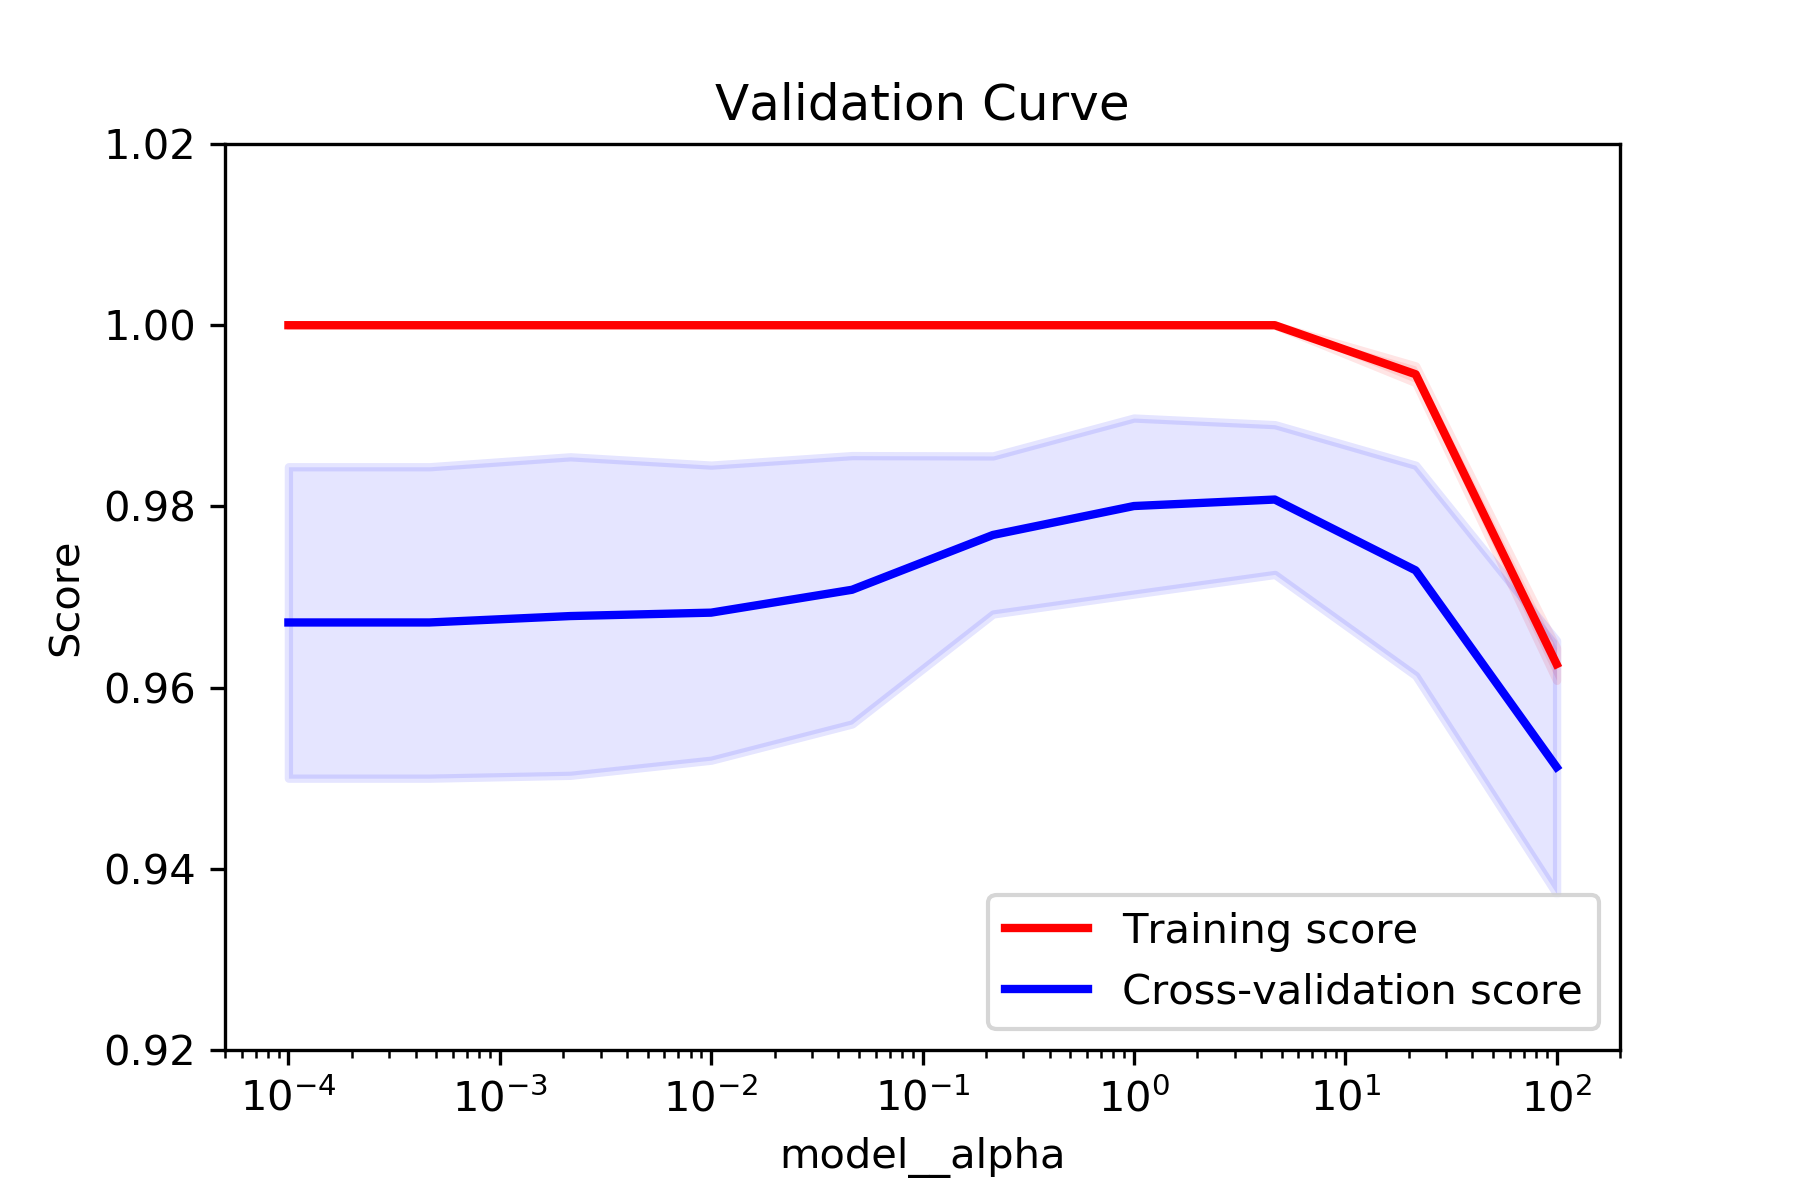
-
Why OMSCS?
In the two years since applying to Georgia Tech’s online computer science master’s program (OMSCS for short), a question I’ve heard from family, friends, coworkers, and recruiters is, “Why OMSCS?” The point of this post is to distill and share a response to that question.
There’s another question embedded in that one, though, which is, “Why get a master’s degree in the first place?”
Why a master’s degree?
Before deciding to apply I think I had a vague, unarticulated feeling that I just wanted a master’s degree. There was no “why”. I pictured myself having one and that vision appealed to me. To an extent I’m still guided by that feeling, but feelings don’t make blog posts.
There are definitely other ways I could spend my nights and weekends that would have a clearer ROI story. The point isn’t just about potential financial upside. If my goal was to convert my freetime to cash I’d probably be doing something else.
As a line-item on a resume, a CS master’s doesn’t hurt. And there are some jobs for which the degree is required. With reported ageism in software and “credential inflation”, it might be in my professional interest to have a master’s. But, again, if my goal was career-oriented there are other, more effective ways to achieve that.
The subject matter I’ve so far studied isn’t itself applicable to my day job. But the program has helped sharpen meta skills: the focus to do deep work on a problem for long periods of time, the confidence to dive into unfamiliar technology, the ability to break a large problem down into more manageable parts, etc.
To date, the classes I’ve taken covered machine learning, supercomputing, and computer vision. I really enjoy learning this material, and I wouldn’t be able to explore it as deeply or as efficiently without the external motivation and guidance of a master’s program. The program provides accountability that I simply wouldn’t have with self-study. There might be people who can do sustained, high-level learning without the pressures of deadlines or grades, but I’m not one of them.
I wanted to prove that I was capable of tackling the challenge. And it helps to combat imposter syndrome. It’s a fun challenge, and I do get a sense of pride when I talk about grad school.
Why OMSCS?
Georgia Tech is a top 10 school for computer science. It has maintained this pedigree even while expanding the college of computing’s reach to thousands of students in OMSCS. The program has been recognized for its excellence. When applying, I read many positive first-hand reviews by current students. And anecdotally, I’ve found the material polished, the work challenging, and the teaching staff engaging.
The degree is identical to GT’s on-site CS master’s – the coursework and degree name are the same, although more classes are available on-site.
It’s affordable. The entire program can be completed for under $7k. On-site master’s programs from top schools charge many times that.
Because the program is entirely online, there is plenty of flexibility. I am able to work a full-time job during the day while watching lecture videos and doing assignments at night and over the weekend. If some other responsibility comes up I don’t need to miss class. The video-based lecture material is also great for being able to revisit tough concepts.
The interaction with other students has been superb. Classes usually have an official Piazza Q&A page set up for student conversations, but the unofficial channels on Slack, Reddit, and Google+ are invaluable. I can’t recall a time I’ve had a question about some assignment or concept and there wasn’t a fellow student online willing to chat about it.
Why not OMSCS?
As I mentioned above, there are limited course options. For example, the Machine Learning Specialization page shows 7 of 28 specialization courses have been produced for OMSCS. That said, the coursework is varied enough to produce well-rounded specializations, and I expect the catalog will continue to grow.
OMSCS is also solely course-based; that is, there is no thesis option. If you want to do independent research as part of your master’s work then this program is maybe not for you.Edit: a current student on Reddit pointed out that the project option is avabile to online students.While the course is affordable, the lecture material is free on Udacity, so someone driven enough could ostensibly learn everything offered by the program without paying anything. Though they’d be missing out on the graded assignments and interaction, which is where most of the concepts click.
Above, I mentioned that the student interaction was great. While that’s true, I imagine that the bonds from flesh-and-blood collaboration and networking are more robust.
Despite, those points, OMSCS is right for me. I was immediately intrigued by GT’s program when I heard about it. OMSCS is an affordable master’s degree, presented as a MOOC, and from a top university. I’m happy I get to explore this frontier in higher ed. I’m looking forward to continuing the program and to the format’s adoption by other schools and domains.
-
Delivering perf reports
A teammate and I are developing a generic scheduling system to replace the built-in Kubernetes CronJob scheduler for triggering thousands of periodic jobs. The built-in Kubernetes scheduler is too slow for our needs – it takes about ten minutes for it to iterate through the list of schedules, but some of our jobs need to run more frequently than once every ten minutes.
This post isn’t about schedulers, though. It’s about considering a performance characteristic report to be a deliverable. When future developers eventually reach the point of needing to scale, it will be valuable to know which scaling knobs can be turned and how. And presenting the report early in the project lifecycle helps spread understanding to outside stakeholders.
By performance report I mean a quantitative exploration of how the proposed system would behave in response to variable constraints and loads. For example, we had to first demonstrate that our new scheduler would be able to handle the current workload (otherwise, there’d be no reason to consider it). Then we simulated changing factors outside of our control, like increasing the number of jobs and the duration of those jobs. We also simulated changing aspects of the system itself, like the number of worker threads. Aside from describing the service’s response to stress, this exercise directly influenced how we architected the system with an eye toward scalability.
I wouldn’t recommend doing this kind of stress test for all projects all the time, though. It might be suitable when the load on the system is anticipated to grow substantially in the medium term. Or if the expected load is going to be stable, but something about the proposed system makes the performance profile hard to estimate, like if it’s implemented on a different stack from what the team is familiar with. Conducting scaling experiments could be overkill for systems that are based on familiar technologies and that are expected to have stable/unremarkable load. In our case, the project’s existence was spurred by degrading performance, so it made sense to keep scaling at top of mind.
We’re shipping this performance characteristic report right alongside the software. Results are captured and explained in a Jupyter notebook that we demoed at one of our company’s internal weekly demo days. We think that the new scheduling system can support 20x our current load – twice the 10x goal we had for the project. If and when future engineers anticipate the need to scale, this report will be there for them. It will show them approximately when the current implementation’s limits will be reached, and may provide insight into what stop-gap measures can be used before an entirely new solution is needed.
-
Getting URL and Tab Title from Firefox with AppleScript
A long time ago, a coworker shared an AppleScript function that gets the title and URL from the current tab in Chrome and formats the result as an Emacs org mode link.
Org mode links have the format
[[url][title]], e.g.:[[https://matthewbilyeu.com/blog/][· Matt's programming blog]]Invoked via Alfred, this script was helpful for getting links from Github pull requests, Trello cards, etc. into my org TODO list. When I began using Firefox Quantum, however, the Chrome-specific script was of no use.
Firefox does not have AppleScript support, which means that any automated interaction with the application must be clumsily achieved through simulating GUI events. I found out that such GUI-based automation is prone to failure. It took some trial and error and cobbling various online snippets together, but so far this script has been fairly robust:
use scripting additions
use framework "Foundation"

tell application "Firefox" to activate

-- get the tab title from FF
tell application "System Events" to tell process "firefox"
	set frontmost to true
	set the_title to name of windows's item 1
	set the_title to (do shell script "echo " & quoted form of the_title & " | tr '[' ' '")
	set the_title to (do shell script "echo " & quoted form of the_title & " | tr ']' ' '")
end tell

set thePasteboard to current application's NSPasteboard's generalPasteboard()
set theCount to thePasteboard's changeCount()

-- send cmd+l and cmd+c keystrokes to FF to highlight and copy the URL
tell application "System Events"
	keystroke "l" using {command down}
	delay 0.2
	keystroke "c" using {command down}
end tell

-- wait for the clipboard content change to have been detected
repeat 20 times
	if thePasteboard's changeCount() is not theCount then exit repeat
	delay 0.1
end repeat

-- get the clipboard contents
set the_url to the clipboard

return "[[" & the_url & "][" & the_title & "]]" as text
References:
- https://apple.stackexchange.com/questions/271161/how-to-get-the-selected-text-into-an-applescript-without-copying-the-text-to-th
- https://www.snip2code.com/Snippet/69440/AppleScript-to-get-url-from-Safari--Fire
- https://www.alfredforum.com/topic/2013-how-to-get-frontmost-tab%E2%80%99s-url-and-title-of-various-browsers/